Farmtastic Recipes

Farmtastic Recipe – Loving Life Limeade

Spring is in the air at the farm and that means plenty of porch time.  And nothing goes better with porch time than the perfect cool drink to sip.  Cowboy is a fan of lemonade and limeade, and our local grocery had oodles of giant, fresh, juicy limes today so a fresh pitcher of limeade was on order. This recipe makes about a half gallon of deliciousness.

Give some limes a squeeze and let us know if this limeade hits the spot.

The Recipe: Loving Life Limeade

The Source: The original was a Southern Living recipe for lemonade, which we’ve adapted just slightly for limeade.

My Farmtastic Life Recipe - Limeade Ingredients
Limes, sugar, and the perfect pitcher. Loving Life Limeade here we come.

Ingredients:

  • 1 1/2 cups sugar
  • 1/2 cup boiling water
  • 1 1/2 cups fresh lime juice, approximately 6 to 7 large limes
  • 5  1/2 cups cold water
  • crushed ice
  • lime slices for garnish

Directions:

  1. In a large pitcher, stir together sugar and half cup boiling water until sugar dissolves. Tip: If you have an electric kettle or any kettle, it’s the easiest way to get boiling water in the amount you need and makes it easy to pour without spilling.  (Yes, spilling is my middle name.)
  2. Squeeze limes and add in lime juice to the pitcher.  Tip:  To get the most juice out of your lime, press and roll under the palm of your hand before slicing.

    Put a little elbow into it and roll your limes. This will make sure they are good and juicy when you are ready to give them the squeeze.
  3. Add 5 1/2 cups cold water to the pitcher.

    My Farmtastic Life Recipe - Limeade in progress
    When you are up to your elbows in lime juice and sugar, you know you are in for a treat.
  4. Pour over crushed ice and garnish with a lime slice.  Tip: I like to fill the glasses with about half crushed ice, which makes it feel almost like a dessert drink to me.
My Farmtastic Life Recipe - Limeade in a vintage pitcher and glasses
This just makes me smile and my lips happy. Sit on your porch, by the pool, or in your favorite chair and enjoy the flavors of spring.

Farmtastic Notes:

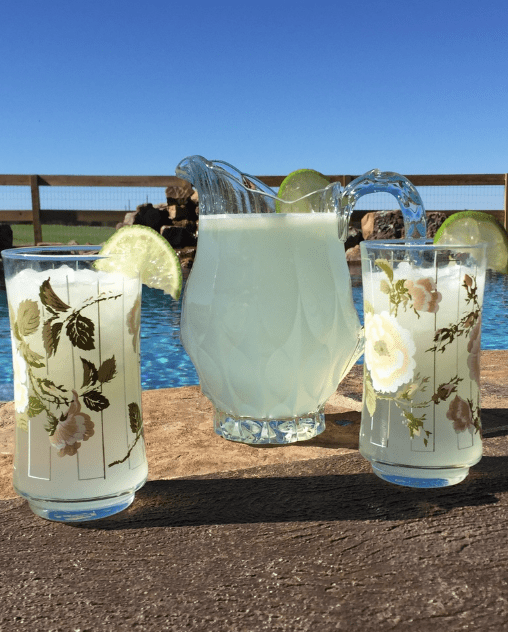
  • Serving this is an antique glass pitcher and using fun vintage glasses makes this simple drink feel extra special.
  • Any you have left over, keep refrigerated.

We’d love to hear what you think of this recipe, so give it a try and share your thoughts or post pics directly to our Facebook page.

Farmtastic Recipes

Farmtastic Recipe – Chicken Tortilla Soup

I love a good soup for lunch or dinner. Sometimes, it just hits the spot.  It’s even better if I can make a giant pot and freeze it for later.  This recipe is perfect for sharing or freezing, making over 15 servings of soup, depending on your appetite.  The best thing about this recipe is that it is chock full of vegetables, and with a broth base, it’s a low cal AND delicious meal.  Double bonus, since there is a lot of chopping, Cowboy and I make this one side-by-side splitting up the chopping duties. The hardest part?  Waiting the hour for it all to simmer together.

Give it a whirl and let us know if this soup hits the spot.

The Recipe: Chicken Tortilla Soup

The Source: The original was in Harvest Gifts  church cookbook from Saint Ann Catholic Parish in Coppell, Texas, and was called Tortilla Soup with Chicken.  However, I’ve altered it significantly over time.  Proof again that church cookbooks are the best.

Ingredients:

  • 4 boneless, skinless chicken breasts

    My Farmtastic Life - Chicken Tortlla Soup
    Yep – this recipe has a lot of ingredients. But it is oh so worth it as the rich flavors come together for one of my all-time faves.
  • 32 ounces chicken stock
  • 1 small onion, chopped
  • 4 green onions, chopped
  • 3 stalks celery, chopped
  • 1 bunch cilantro, stems removed and chopped
  • 4 cloves garlic, minced
  • 6 chicken bouillon cubes
  • 10 tsp. cumin
  • 4 tsp. chili powder
  • 5 tsp. salt
  • 1/2 tsp. pepper
  • 2 tsp. crushed red pepper
  • 2 tbsp. chopped green chilies, from can
  • 10 ounces chopped mild tomatoes and green chillies (Rotel)
  • 14 1/12 ounces diced tomatoes with green pepper, celery, and onion
  • 4 large zucchini, chopped into moons
  • 3 cups carrots, chopped into rounds
  • 3 ears of fresh corn, kernels sliced from cob
  • 15 corn tortillas, torn into bite-size pieces
  • Optional for garnish: Colby and Monterey Jack shredded cheese, crispy corn tortilla strips

Directions:

  1. In a large pot, bring chicken to a soft boil, approximately 20 minutes.  Reserve broth for adding into soup.  Shred or dice chicken, your preference.
  2. In a large stock pot, at least 12 quarts in size, add in the chicken stock, onions, celery, green onions, garlic and cilantro.  Simmer until tender.  About 5 to 7 minutes.

    My Farmtastic Life - Chicken Tortilla Soup
    Adding in the broth. This is a 12 quart stock pot. noticed how deep the soup currently is.
  3. You will need to add in 16 more cups of water.  Use what you can from boiling the chicken and then make the rest up with water.  You now have 20 cups of liquid in your pot.  (4 cups of chicken stock plus 16 cups of chicken water/plain water)

    My Farmtastic Life - Chicken Tortilla Soup
    Once all broth is added, the pot is about half full.
  4. Add in ingredients from bouillon cubes through tortillas.  Stir.  Add in chicken.  Cover and simmer at least 1 hour.  Longer is okay.  Stir occasionally.


  5. Serve immediately.  Top with tortilla strips and cheese, if desired.

    My Farmtastic Life - Chicken Tortilla Soup
    The soup has a vibrant, spicy broth and is loaded with veggies. Make sure to stir the whole pot before serving. The chicken will be on the bottom of the pot.

Farmtastic Notes:

  • Sometimes I make fresh rice, either white or brown, and place 1/2 cup of cooked rice in a bowl and pour the soup over it.  This makes it almost like a stoup, as Rachael Ray would say a cross between a soup and a stew.
  • I freeze this in quart size bags.  It lays flat for easy storage, and it makes a perfect meal for two or side dish for 3 to 4 in a pinch.  Lay filled bags on a cookie sheet for easy transport.

I’d love to hear what you think of this recipe, so give it a try and share your thoughts.

Farmtastic Recipes

Farmtastic Recipe – Veggie Pizza

With fresh veggies coming into season, we like to find yummy ways to use them up, whether they come from our garden, a farmer’s market, or our local grocer.  I originally got this fun recipe from my sweet mother-in-law, and the truth is you can really use any veggies that you love to munch on.  Make it up as an appetizer for summer get-togethers, as a snack to share, or for a quick lunch time bite.  Best of all it keeps for a couple of days.  My favorite part – the crunch of the veggies combined with the tart creamy sauce.

Give it a whirl and let us know what you like on your pizza.

The Recipe: Veggie Pizza

The Source: Cowboy’s Mama 

Ingredients:

  • 2 tubes of original Pillsbury Crescent Rolls, 8 count each

    Farmtastic Recipe - Veggie Pizza
    Gathering veggies and accoutrement to put together a scrumptious snack.
  • 8 ounces of cream cheese, softened
  • 8 ounces of sour cream
  • 1 packet of ranch dressing mix
  • 1 green bell pepper, diced
  • 1 red bell pepper, diced
  • 1 1/2 cups carrots, chopped
  • 1 medium head of broccoli florets, chopped
  • 1 cup shredded cheddar or Mexican cheese


Directions:

  1. Preheat your oven per direction on the crescent rolls.  Take your favorite cookie sheet, grease lightly.  My favorite way is to put a dab of olive oil on a clean paper towel and wipe down my cookie sheet.
  2. Roll out the crescent roll dough in a flat layer.  Pinching together the seams. Bake according to directions.  I generally go with the least amount of time on the range provided.  Crust will turn golden brown and puff up slightly. Remove from oven and cool completely.

    Farmtastic Recipe - Veggie Pizza
    If only making dough from scratch was this easy. Simply roll out your crescent rolls and go.
  3. Combine all of your chopped veggies in a large bowl and toss until they are completely mixed.

    Farmtastic Recipe - Veggie Pizza
    Delicious bowl of fresh veggies all chopped up. If you have one, visit your local farmer’s market and pick out your faves.
  4. In a medium bowl, use hand mixer to blend cream cheese and ranch dressing mix.  Blend in sour cream until mixture is smooth.
  5. Once crust has cooled, spread your cream cheese mixture onto the crust.  This is your pizza sauce.

    Farmtastic Recipe - Adding the sauce for veggie pizza.
    Spread your sauce on your pizza. I use an icing spreader.
  6. Sprinkle on the cheese, top with the veggies.
  7. Slice and enjoy immediately.  Keep leftovers refrigerated.

    Farmtastic Recipe - Veggie Pizza
    Time to take this perfect snack to the porch. Let us know what you like on your veggie pizza.

Farmtastic Notes:

  • If you want to make this ahead for a party, prepare crust, sauce, and veggies separately.  Store all ingredients in fridge separately.  Assemble right before party.
  • Will keep in the fridge for two to three days.  I usually leave it on the cookie sheet and just cover with tin foil.
  • Sometimes I use Neufchatel cheese instead of cream cheese.  I think the taste is the same, it is just a lower fat option.

I’d love to hear what you think of this recipe, so give it a try and share your thoughts.

Farmtastic Recipes

Farmtastic Recipe – Sunday Banana Bread

Around the farm on the weekends, we usually have some extra time away from our chores to relax and do the little things that we enjoy.  For me, I love to cook and to bake.  While I often try to bake the things that Cowboy loves most, sometimes I just have to indulge in a just-for-me recipe, and one of my favorite comfort foods is banana bread.

Cowboy is not a lover of bananas.  Not sure if he had some pre-school trauma, but the man cannot stand the smell of them.  However, I buy bananas almost weekly and without fail have a couple that have seen their best days as cereal toppers and snacks.  So I have two options – freeze them for a smoothie or bake them into something scrumptious.

And since it is Sunday, I thought I’d pull out my go-to recipe from a church cookbook.  (P.S. – If you are a lover of comfort food, look no further than a good church cookbook.  They are full of family favorites and are sure to please. I always pick them up at garage sales for just pennies and add them to my cookbook collection.)  

I think the cinnamon and cloves make this banana bread extra special.  Give it a try and let me know what you think.

The Recipe: Sunday Banana Bread

The Source: Harvest Gifts  church cookbook from Saint Ann Catholic Parish in Coppell, Texas (NOTE: The original was called cinnamon-banana bread.) 

Ingredients:

Recipe Photo - Banana Bread Ingredients
Collecting the ingredients to put together this scrumptious treat.
  • 1 cup sugar
  • 1/2 cup shortening
  • 2 eggs
  • 1 1/2 cups flour
  • 1 tsp. baking soda
  • 1/2 tsp. salt
  • 1/2 tsp. cinnamon
  • 1/4 tsp. ground cloves
  • 1 tsp. vanilla
  • 1/2 cup walnuts, chopped
  • 1 1/4 cups bananas, smashed

Directions:

  1. Preheat oven to 350 degrees.  Butter a loaf pan and dust with flour.  Set aside.
  2. Cream together sugar and shortening.  Add eggs.
  3. Sift together flour, baking soda, salt, cinnamon, and ground cloves.  Add to wet mixture and mix until well incorporated.

    Recipe Photo - Banana Bread batter coming together
    Adding in my dry ingredients. Truth be told, my KitchenAid mixer makes baking oodles easier. (This one is pistachio green, and I also use vintage pyrex bowls for mixing.)
  4. Add in vanilla and bananas.  Mix until incorporated.  Add in walnuts.
  5. Pour into prepared and bake for 50 minutes to an hour, until golden brown and when a toothpick inserted into the center comes out clean.  Let cool slightly.  Turn out of pan and slice.  Serve immediately or store in airtight container.

Farmtastic Notes:

  • When baking, I always make sure to crack my eggs into a glass and then add them to the mixture. I learned my lesson the hard way when I dropped shells into a mixer in motion.  Not fun, not fun at all.
  • Cloves are a strong flavor. I often do a little less than 1/4 tsp.  Now if it is full on fall and I’m in the mood, then I’ll add the whole 1/4 tsp.

I’d love to hear what you think of this recipe, so give it a try and share your thoughts.

Farmtastic Recipes

Farmtastic Recipe – Trude’s Stuffin’ Muffins

In honor of my Gram’s birthday this week and with Thanksgiving on the horizon, I thought I’d share one of her recipes, which is probably our family’s absolute favorite.  When it comes to stuffing, we all know the debate of in or out of the turkey, well Gram solved  the debate in the best way possible – stuffing muffins.  She whips up her famous stuffing and then bakes them in individual muffin cups.  Why is this so amazing?  Because it gets crunchy on the outside while staying fluffy and perfect on the inside.  Who doesn’t love that?

Gram has now passed the torch of stuffin’ muffins over to me, and Cowboy and I are expected to show up at the holidays pans in hands.  Even Cowboy’s sister is a convert.

The Recipe: Trude’s Stuffin Muffins (makes 12)

The Source: My Farmtastic Life

Ingredients:

  • 1 loaf of white bread
  • 1/3 to 1/2 cup green bell pepper, diced
  • 1/3 to 1/2 cup celery, diced
  • 1/3 to 1/2 cup white onion, diced
  • 6 to 8 Tbsp. butter, melted
  • 2 to 4 Tbsp. water
  • Salt and pepper to taste
Recipe Photo - Ingredients for stuffin' muffins
Ingredients for the perfect Thanksgiving side dish.

Directions:

  1. The night before, lay bread out on cookie sheets for it to get stale and crusty over night.  (If you have cats who aren’t supposed to get on the counter, but let’s be honest we all know the truth, cover the cookie sheets with clean dish towels. No judgement here!)

    Recipe Photo - Bread prepping
    Bread all laid out and getting its crunch on.
  2. Preheat oven to 350 degrees.
  3. Cut bread into half-inch cubes.  Place into a large bowl for mixing.  I use a large pot.

    Recipe Photo - Bread cut into cubes
    Cut bread into cubes. This is when that bread knife comes in super handy!
  4. Add in bell pepper, celery, onion, salt and pepper.  Gently toss together.  This is where the fluctuations in measurements start to come in, as it really is by feel and what you like.
  5. Add about half of the butter and water.  You won’t want to add it all just yet.  Using your hands start blending it together, like your are working dough.  Keep working it and add the remaining butter and water if needed, until the mixture can be formed into muffin sized balls that will hold together.

    Recipe Photo - Butter pouring over  stuff in' muffin ingredients
    Pouring in the butter. Who doesn’t love butter? And for the holidays, we’re sure it’s calorie free.
  6. Place stuffin’ muffins into a muffin pan.  You should have 12 muffins, perfect for one pan.  You won’t need to grease the pan, due to the butter in the muffins.
  7. Cover with tinfoil.  Bake for 30 minutes.  Uncover and bake for 5 to 10 more minutes until golden brown.  Let cool for five minutes.  Spoon each muffin out of the pan and serve with your favorite gravy.

Farmtastic Notes:

  • We usually double this recipe for family gatherings.  We plan on at least 2 muffin per guests.  Of course you can always make more as they are great as leftovers.
  • If you have leftovers, wrap muffins in a damp paper towel and microwave for 30 to 45 seconds.

I’d love to hear what you think of this recipe, so give it a try and share your thoughts.

Farmtastic Recipes

Farmtastic Recipe – Roasted Vegetables and Wild Rice

I’m always in search of great side dishes, something to shake Cowboy and I out of our potato-and-grean-bean rut.  This recipe has some of my favorite veggies, which when combined with wild rice make the perfect mate to grilled chicken, pork, or steak. This is a one-and-done side dish, meaning simply add your protein and you are good to go.  While it takes 40 minutes to cook, that gives you plenty of time for the rest of dinner prep and clean up.

Here are my notes on this all-in-one side dish.

The Recipe: Roasted Vegetables and Wild Rice

The Source: Southern Living and My Recipes (click here for the official recipe)

Farmtastic Notes:

  • I altered this recipe in order to make just enough for four people as a side dish.
  • For the rice, I used Uncle Ben’s Wild Rice Original Recipe, one 6 ounce box.
  • For the veggies, I used 1 red bell pepper, 1 zucchini, 1 yellow squash, and 1/2 medium white onion.  All chopped into bite-size chunks.
  • For the nuts, I used a heaping 1/4 cup of raw slivered almonds.  I’ve used up to 1/3 of a cut, depending on what you like. I did not roast them or add more salt to them.
  • For the olive oil, I used extra virgin.  I mean, really, is there any other kind?
  • For the seasoning salt, the rice comes with it’s own spice mix, so you might want to reduce the seasoning salt to 1 1/2  to 2 tsps., depending on your preference.  This will keep it from being too salty when you add the veggies to the rice.
  • For the pepper, I never measure. I just get my grinder out and eyeball it.
  • When roasting the veggies, heap them onto the cookie sheet.  If they are in too thin of a layer, they will burn.  I like to mound them (see photo).  Also, on their second set of 20 minutes in the oven, keep an eye on them.  They can start to char, and sometimes 15 minutes will do you.
  • You’ll want to start cooking your rice after the veggies go in the oven.  It takes about 25 to 30 minutes to cook down.
  • Finally, this dish is not only delish, but it’s super colorful, so it’s great for company when you want to dress things up and have your guests say, “Yummy!”

This slideshow requires JavaScript.


I’d love to hear what you think of this recipe, so give it a try and share your thoughts.

Farmtastic Recipes

Farmtastic Recipe – Broccoli Cheese Soup

Yes, it’s still warm in Texas, but we are getting glimmers of fall with some cooler mornings and days that don’t make you melt. And when it comes to fall food, I absolutely love a good soup.  While Cowboy is not a soup fan, he’s more of a meat and potatoes fella (hold your shock), I think soups make great lunch time options or a quick dinner meal.  And with the shorter days of fall and farm chores to get in during daylight hours, I love something I can make on the weekend and get several meals out of during the week.

On the hunt for a great broccoli cheese soup, I let my fingers do the typing and came across a wonderful blog – The Recipe Critic.  Here are my notes on this bowl of soup that feels like a snuggly hug.

The Recipe: Panera Copycat Broccoli Cheese Soup

The Source: The Recipe Critic (click here for the official recipe)

Farmtastic Notes:

I made the soup as directed with a few little tweaks:

  • First, when making the roux, I added my salt and pepper at this step.
  • I add a touch more butter when sweating down my onions.  Admittedly this was because I was going too quickly, and misread the recipe, but it was still divine.  Butter makes everything better.
  • When it comes to broccoli, I wanted a bit more, so my thought was if 1 cup was great, 2 cups would be divine.  And just as I thought, I got yummy broccoli bits in every bite.  And while on the broccoli note, I used fresh florets chopped well.
  • Because I upped the broccoli factor, I reduced the carrots to about 1/3 of a cup, but I think 1/2 cup would have been perfect.  Also, instead of a julienne cut, I diced my carrots into small bite-size chunks.
  • For the cheese, I opted for a mild cheddar.  And if you get the finely shredded kind, it practically melts as soon as you add it to the soup.
  • Remember to keep the heat on a low simmer.  It can get steamy pretty quickly, and you don’t want the dairy to break on you.

This slideshow requires JavaScript.

Overall, this soup was absolutely delicious, and is definitely going into the repertoire of wonderful fall meals. I’d love to hear what you think of this recipe, so give it a try and share your thoughts.

P.S. – In the photos, I’ve included some super cute kitchen must-haves.  Just ask Cowboy, I’m a sucker for adorable glassware and anything that makes the kitchen fun. Here’s where to find them:

  • If you like my adorable wooden spoon, it’s from ModCloth.  While they no longer carry the chirping birds, I absolutely love the fall version with a squirrel.  Just keep in mind it is a hand-wash only item.
  • The soup bowls are Fish Eddy vintage flower storage bowls. What makes these guys great is that they come with plastic lids so they are an excellent choice for fridge storage.  Measure out your soup and get it ready for the week. Also available at ModCloth
Farmtastic Recipes

Farmtastic Recipe – Lemonade Cake

To celebrate the end of summer,  I decided to do a little baking with one of Cowboy’s absolute favorite flavors – lemon!  I came across a recipe for lemonade cake in a recent issue of Cooking With Paula Deen.  And let’s be honest, nine times out of 10 her recipes turn out yummy.  Could it possibly be the oodles of butter?  Most definitely, but for the occasional splurge, who says you can’t have a little fun?

Here are my notes on this lemony delight.

The Recipe: Lemonade Cake

The Source: Cooking With Paula Deen Magazine (click here for the official recipe)

Farmtastic Notes:

  • I made the cake exactly as directed with one exception, I only added 1/2 tablespoon of lemon zest.  My lemons were tiny, and it was all I could eek out.  It was still lemony good, so I don’t think I missed anything.
  • For the icing, I added 2 tablespoons of milk to get the consistency I wanted, as well as to take a smidge of the tartness out.
  • The finished product was quickly gobbled up at the farm.  The cake was perfect, slightly dense and super moist.  But the icing was a little sweet for me.  Admittedly, I’m a cake girl, but Cowboy is an icing guy and he gave it a thumbs up.  I think I might try it with a vanilla icing next time.
  • A couple of baking notes:
    • I buttered and floured my cake pan to prep it.  But like my mama taught me, I also cut a piece of wax paper to fit in the bottom of the pan.  This ensure it pops right out, but of course be sure to remove the wax paper!
    • When adding my eggs to the mixer, I crack them into a small mason jar and then add them to the batter.  And yes, I learned this the hard way, as I cracked an egg and all of its eggshell glory into batter once while the paddle attachment was mid mix.  And let’s face it, that just makes quick work of the eggshell, and then your entire batter is crispy, crunchy, ruined.  It’s easiest just to avoid this with a little extra step.

This slideshow requires JavaScript.

I’d love to hear what you think of this recipe, so give it a try and share your thoughts.

Farmtastic Recipes

Farmtastic Recipe – Tomato Basil Salad

This year we’ve been trying our hand at growing a small vegetable garden, and in honor or Ouiser Boudreaux and southern girls everywhere, it most certainly includes tomatoes.  Right now, we’re getting tomatoes daily, which just begs the question, “What the heck do you do with them all?”

This recipe is one I mix up in the kitchen for a quick snack or dinner side, and was taught to me by friends and by observation.  Having grown up with a limited palate (yes, I was the kid whose food could not touch), I’ve enjoyed exploring what, to some, may have very well always been part of their realm of deliciousness.

Enjoy and let me know how you like your tomatoes!

The Recipe: Tomato Basil Salad

The Source: My Farmtastic Life

Ingredients:

  • Tomatoes, chopped
  • Fresh mozzarella, chopped into bite-sized chunks
  • Fresh basil, torn into bits
  • Extra virgin olive oil
  • Balsamic vinegar
  • Freshly ground sea salt and black pepper

    Recipe Photo - Fresh tomatoes and basil
    Fresh tomatoes chopped straight from the garden, and some beautiful basil from Cowboy’s mom’s garden. (And yes, that is Goober snoozing in the background on the far left. It’s our farm, so of course there’s a critter close by.)

Directions:

  • Mix all ingredients and enjoy immediately.

Farmtastic Notes:

  • This is one of those recipes that doesn’t have exact measurements, which truth be told used to drive this slightly OCD farmgirl a bit nuts. However, the point is to just have fun.  Make a little or a lot, depending on how many you have to feed.  In general, one medium tomato per person.
  • The key is to get a little taste of each yummy ingredient in each bite.  I like to chop things up somewhat small so I can make sure to savor the farm fresh glory of this salad.
  • In general, I like to to use equal amounts of olive oil and balsamic vinegar.  And don’t forget the salt and pepper.  The fresh mozzarella will soak up the juice and the spice.
Recipe Photo - Tomato basil salad
The finished product ready for munching.

I’d love to hear what you think of this recipe, so give it a try and share your thoughts.

Farmtastic Recipes

Farmtastic Recipe – Praline Pull-Apart Bread

Spring and summer are when we welcome the most visitors to the farm.  It seems our city friends love to have an escape to the country life, and with wildflowers and sweet tea plentiful around here, we are considering installing a turnstile at the gate.

With that said, I love this recipe for it’s ooey gooey goodness as a dessert, or as a decadent breakfast complete with a cup of steaming coffee or tea.  Here’s to a sugar high!

The Recipe: Praline Pull-Apart Bread

The Source: Southern Living and MyRecipes.com (click for the official recipe)

Farmtastic Notes:

  • I prepared this just like the recipe, including using Rhodes White Dinner Rolls.  (If anyone is brave enough to try another roll, let me know how it goes. I’ve had such good luck, I can’t bring myself to try anything else.)
  • I’ve added more or less pecans, depending on what I know our guests like.  For example, Cowboy’s dad would be happy if I doubled up on the pecans, and Cowboy would prefer I leave them off all together.  How’s a farmgirl to win?
  • This does require chilling for 8 to 18 hours before cooking. I find putting it together the night before to be the perfect solution.  It means for an easy day.
  • This has definitely become a family favorite.  My grams has decided it’s better than birthday cake!
  • Leftovers are yummy for about two days, if you and your guests can keep from gobbling them sooner. I keep them in a glass cake pedestal with  cover.

I’d love to hear what you think of this recipe, so give it a try and share your thoughts.